I have been a very bad christmas crafter this year - most of the cards I sent were bought (shock, horror) and I have been so very disorganised that I still have near neighbour cards to deliver!!! On Christmas Eve. *sigh*
So. I have resolved that in 2014 I am going to make one christmas card each week that can be put away for next year. This should mean that I have at least 52, right? That should be ample. And I will have no excuses.... I've set myself up a ticker *points up to just under the header* to track progress.
Let's see how long I can keep it up - my thinking is that even if I don't do it for the whole year it has got to be better than this!!
Xmas 2015

Tuesday 24 December 2013
Monday 9 December 2013
Winter Fun - Challenge 106 at Crafty Cardmakers

Marie would like you to create something that portrays winter fun, but is neither Christmas nor New Year Related. In other words no Christmas cards/projects or New Year cards/projects, but some form of fun you might have during the Winter, skiing, skating, sledding.
For my card I have used a fun image supplied by one of our sponsors, The Paper Shelter, called Snow Angel. My card is for a winter birthday - so hard to find a suitable card when Christmas has taken over!
I used a Kraft card base, and layered onto the top of the front some blue paper from my stash which had some small random white dots on it that looked a bit like snow. To complement the theme, I stamped some additional proper snowflakes using some brilliance white ink.
I coloured my image using promarkers and a spectrum noir and a Graph'it pen
(Hair: SpecNoir FS1, Pro Henna, Burnt Sienna, Terracotta, Raw Sienna, Gold; Hat, scarf and gloves: Pro Moss, Pear Green, Lime Zest, Lime twist, apple cider; Coat: Pro Tan, Cinnamon, Tawny Owl, Warm grey 3 and Skirt: Pro Mango and Graph'it 4175)
I cut the image topper to be square and then distressed the edges of it using distress inks and stamped a small motto in the bottom left hand corner. I stuck the topper image onto my base layer at "a jaunty angle" and finished it off by doing some faux stitching around the edge using a thin nib on a promarker. I added some glitter to the snowy lines using a quicky glue pen and some of the fine glitter I recently won in a blog hop run by creative expressions.
I did some more faux stitching around the edge of the card base using a black fine line pen, and finished the card by adding a round sentiment. This was made using a circle punch, and a stamped image which was embossed with silver embossing powder. Finally, I used the same distress inks as previously used to make sure it matched in colour.
This time we are sponsored byTHE PAPER SHELTERwith a $20 gift certificate for their fabulous store
If you are looking for fun, cute and lovely digi stamps for your paper-crafting or web design projects, The Paper Shelter is your one-stop boutique! This growing catalog of high-quality digi stamps with many different kind of options offers a multitude of themes such as everyday items, holidays, special occasions, children, adorable characters and creatures. Stamps are available in standard black and white line art, as well as in pre-colored format. Images are wonderful for coloring and make perfect additions to greeting cards and scrapbook albums. In "The Paper Shelter" you'll also find great other resources for all crafts (or digital) projects, like Paper Packs, Printables, Accessory sheet, etc.


Sunday 8 December 2013
Haberdashery corner
So over the past couple of months I have been trying to sort out my stash. One of the problems I had was that everything was scattered all over the place - a box here, a bag there - and one of the worst things was my ribbons and lace. I kept finding I had bought more of some ribbon I already had because I didn't know I had it.
I decided that the best thing was to find it all and get it in one place, and I came up with this storage solution:

I bought a baby bookcase from Argos for £12.99 - it measures 25" wide, by 32" high and 6" deep.
When I made it up I left the backboard off - I needed to put it on my windowsill and wanted to get light through it where possible. There is a risk that the sun will discolour the ribbon in places but I decided that was a risk I was prepared to take.
It came with two shelves, and I put those at the top and bottom of the unit. This left quite a big gap in the middle...
I bought some 9mm dowelling from Homebase and cut 4 pieces to fit the opening. I tried to get some wardrobe rail fixings, but they were too big (and expensive!) and ended up with some plastic pipe clips that I hot glued to the inside of the unit equidistantly.
Then I slotted my ribbons reels onto the dowelling and clipped them in place.
Some extra reels are stored under the bottom shelf, and on the bottom shelf are some stick on lace borders.
On the upper shelf I stored some boxes of very narrow upholstery trimmings.
Lastly, the small rolls and loose lace in my collection were stored in some (amazing value!) jars I bought from Ikea for just £1 each.
I was really pleased with my storage solution - all I have to do now is keep it tidy!!!
The next task is to find what the heck I have done with my hotfoil manual and foils....
Monday 25 November 2013
Crafty Cardmakers challenge 105 - clean and simple

Clean and Simple is defined as
A design of card with clean lines, minimal elements, areas of white space and few or no embellishments, most often single layered or minimal layers.


I chose a sympathy card for this challenge - I think the nature of the card really suits clean and simple, because it is not the time for fussy and embellished.
My card base was a 6 x 6 square plain smooth white card.
I particularly liked this clear stamp called humming bird garden, from Inkylicious, which was stamped with black versafine ink onto the offcut from my A4 sheet! I trimmed this topper to size, and then edged it with the black.
A simple sentiment was stamped in the bottom right hand corner, and I used a fineliner pen to make my own "frame", using a method often used by Barbara Gray, but which I haven't really tried before. I quite liked the outcome, so will probably use it again.
For this challenge:

I have been drawing since a child and studied graphics at College many years ago, I now work as a Medical photographer part time but my love was always drawing. I started cardmaking about 4yrs ago when I bought my daughter a cardmaking kit which we did together, but I’m afraid I got the bug! My daughter preferred scrapbooking. I then started looking online at other blogs and this then became my passion and I loved sharing my cards with likeminded people.
I love stamping and loved finding images, but sometimes I could not find what I wanted so I started to draw myself.
This then has become my second addiction and I have never looked back, I love thinking of new images, and its just fabulous to see others take them and make them into beautiful works of art.
Long may it continue!
and
THE STAMPMAN
We are kindly sponsored for this challenge by The Stampman (and Lady of course!) who are ofering the winner a £10 voucher for their store, you can spend this online, or if you're lucky enough to see them at a show! They have a ton of items in store, enough to tickle any crafty taste bud.
Sunday 24 November 2013
Candle holder - present?
 Credit for this project must go to Elena F's blog originally - and then a tutorial provided by Lasatas Crafty Hideout blog. The basis of the project was a "wavy crisps" tin - I used the Aldis version of Pringles (because it was cheaper) for this one, but beware, it IS shorter than the Pringles version, and some long candles may not fit. (The ones I had from IKEA didn't, sadly).
The papers used came from a Docrafts Christmas paper stack and the ribbon, lace and silk flowers were all from my stash. I was really pleased with this as a first attempt! The idea is that the long candles are tied together with ribbon and stored inside. My tin still smelt a bit of cheese and onion, even thought I washed it out first, but I would imagine scented candles would remove that. If plain candles were used, I would include a tumble drier sheet in the bottom of the tin to give some scent.
Sunday 17 November 2013
Autumnal card for a man

This card is my take on that design - it is pretty much (well exactly) the same layout, but I used a 7 x 5 card base, chose different papers from my stash, and coloured the trees accordingly.
The background papers come from a pad from Trimcraft called Noel, and while there were some very christmassy papers in there, I think you will agree that the sheets I used really don't look like it.
The joy of having the middle strip is that you can actually use leftover bits of paper! I used some of the leftover parts of my backing paper to make some home made card candi - just punch out some circles using a regular hole punch and emboss them from the back using a largish embossing tool (not the glitter girls big one - a bit smaller). I attached them to my card using pinflair gel.
The stamps are from Woodware (Kim's Coppice) and included the lovely sentiment. I stamped the more solid set of trees with a combination of adirondack inkpads (sorry - didn't note which ones) on a plain piece of card and left them to dry. Then, I stamped the more open set of trees slightly offset with versamark, and heat embossed with bronze embossing powder. Before layering my image onto the layer card, I cut out the edges with a reverse circle corner punch.
I stamped the sentiment with versamark and embossed that too - layering it with the same backing paper as the image.
I am entering this card into the following challenge(s)
My Sheri Crafts - Fall/Thanksgiving
So Artful - Trees
Ladybug Crafts - autumn colours
Monday 11 November 2013
Crafty Cardmakers Challenge 104 - Paper Piecing

Viv would like to see something paper pieced on your project. You could, for example, paper piece a flower, part of your image such as a character's clothing, you could even paper piece an animal image for a funky look.. I am sure you can think of other ideas!
I chose this time a card I made at a recent workshop at In2Crafting, led by the very talented Alexandra Kamann which somewhat fortuitously, featured paper piecing!
This is a technique I haven't used much in the past as my attempts have not been very successful. However, the trick, I have learnt is to have a good stamp....
The base card was a kraft card base, that was 6" square. Onto this, I layered a textured turquoise paper. The sentiment was stamped first, and then snowflakes were stamped all over with versamark ink and embossed with white powder. At the bottom of the sheet, I stuck some double sided adhesive that had been cut into a wavy shape. Ultra fine glitter was then rubbed into it.
The reindeer from Woodware was stamped firstly onto Kraft card and the antlers and hoofs were coloured using a white sakura glaze pen. Then, I stamped the body of the reindeer on a selection of Christmas paper and cut and pieced the body area. Finally (you can't really see it in the photo) I used a silver nail head coloured with red promarker for the nose.
This week, we are sponsored by
SATURATED CANARY
with two of their fabulous digis

Thanks for having me this challenge! Good luck everyone!
and also by
WOODWARE
with this fabulous prize -
'With a prize of £12.00 to spend at your favourite Woodware Stockist, either in store or on line'

Saturday 26 October 2013
Blog Candy!

CuteCottageCrafts have a couple of places left on their all day colouring class - why not go and have a look? If you leave a comment and link to their page, you could win this gorgeous Blog Candy. What are you waiting for????
Monday 14 October 2013
Challenge 102 at Crafty Cardmakers - Shabby Chic

I'm never sure if my cards are shabby chic or not when I make them, so hopefully this one does fit the bill! For my base card I used a plain white heavyweight cardstock cut to be 5.75 inches square.
I cut a burgundy diecut "base" for my image from some scrap card. I cut the next size down out of some white scrap for the image, which I stamped twice. The top image was cut round before colouring and the edges of both were coloured with aged mahogany distress ink. The top image was coloured using spectrum noir alcohol pens. I normally use my promarkers, but have been conscious that I have the speccies and never use them!
Before layering with some floral papers from my stash, I distressed the edges of the card and the lighter paper with aged mahogany distress ink. Before sticking the backing papers to the card base, I wrapped some burgundy ribbon around it (I know it looks scarlet or bright red in the picture, but it was really the same colour as the diecut base!) and tied a second piece in a knot. Once the papers were in place, I attached a punch cut butterfly - base was scrap card coloured with the distress ink, and the top layer was cut from an offcut of the bottom paper layer. I stuck three pearls along the body line.
In the bottom right hand corner I built up a group of paper flowers that was already made in my stash pot (colouring some of the white ones with the distress ink). I used a diecut from my scrap box to go in the top left hand corner. Finally, I added some more pearls to "hold the image down" onto the burgundy card cut to shape with a spellbinders die.
I haven't put a sentiment on this yet, but think it could be used for a birthday, anniversary or get well.
Milk Coffee Stamps is a digital image shop specialising in cute and girly images. We provide high quality digital images with high resolution so you could resize at a big enough size for your project. We have many different image styles; sophisticated lady, cute girl, whimsical image, cute stuff, fairytale creature, and many other varied themes so they can fit many different crafting styles.
And also by
And also by
with this fabulous prize:-

Sir Stampalot is a retail shop and online website that specialises in stamps, die cutting and paper-crafting goodies. We try to offer exceptional delivery times on your orders as well as keeping our stock fresh, new and exciting! Our dedicated team of card makers means we have a wonderful, inspirational online card gallery with many more cards still to upload! Sir Stampalot ships internationally as well as domestic so why not check us out if you haven’t already – www.sirstampalot.co.uk.
Happy Crafting!
Happy Crafting!
Sunday 6 October 2013
Here's a heads up...

Anniversary card

I find it hard to come up with cards for men at the best of times, and with a shortened timescale decided to keep it clean and simple.
I used a plain white card base, which I layered with red card. Then I used one of my new Die D-lites from Spellbinders to cut out the filligree heart in the centre of a white square. This showed through the red from underneath. The top heart was cut using both elements from the die set in the same red as the base layer.
I stamped the banner and cut it out from the white card, but had no sentiments that would easily fit. So I turned to my trusty peel offs. They were in silver though, and I wanted them to be red... Thank goodness for Promarkers! I used Poppy to colour the sentiments, and the three small hearts in the top right hand corner.
And because it still looked a bit unfinished, I used the thin nib on the promarker to make some faux stitching around the edge.
I am entering this card into the following challenge:
papercreatorscrafts Challenge 15 - Dies or Punches
Wednesday 2 October 2013
Bertie the Snowman

The stamp was stamped onto plain white cardstock using a memento ink pad. He (and the penguin hats) was coloured in using coloured pencils. I used glossy accents on the nose and feet, and some black accent to make the eyes and buttons stand out.
The image was mounted onto red card and then layered onto plain white card base. The "ribbon" frame was done by hand using a fineline marker pen.
Quick and simple...
Monday 30 September 2013
Crafty Cardmakers challenge 101 - Cute and Furry

Welcome to our latest challenge, hosted by me this time and I have chosen the theme 'Cute and Furry'
I would like to see the main focal point of your creation be something that is cute and furry. It can be a digi stamp, stamp, photographic image, but must have fur and be cute.
For my card I have chosen to use a topper and some background papers from the Crafters Companion Moreheads CD. I love this little pup - and he is ideal for this birthday card which I needed to make quite quickly because all the main elements of the card are on the sheet you print out.
The base card was cut to be square (it's about 5 3/4 inches) and was a nice thick cardstock. Onto that I layered a docrafts backing sheet in a mauve, which matched the iris in the picture perfectly.
Next was the components from the printed off sheet - the base layer was printed onto matte paper, and the topper part onto semi gloss photo paper. I added some gems and paper flowers from my stash to finish it off. The hardest part was cutting the small scallop around the topper edge - but even so this was a really quick card to make and sometimes, that is what you need!
Good luck with your cards - I look forward to seeing your creations.
DI'S DIGISTAMPS
with a $10 GIFT VOUCHER
I have been drawing since a child and studied graphics at College many years ago, I now work as a Medical photographer part time but my love was always drawing. I started cardmaking about 4yrs ago when I bought my daughter a cardmaking kit which we did together, but I’m afraid I got the bug! My daughter preferred scrapbooking. I then started looking online at other blogs and this then became my passion and I loved sharing my cards with likeminded people.
I love stamping and loved finding images, but sometimes I could not find what I wanted so I started to draw myself.
This then has become my second addiction and I have never looked back, I love thinking of new images, and its just fabulous to see others take them and make them into beautiful works of art.
Long may it continue!
and
THE STAMPMAN
I love stamping and loved finding images, but sometimes I could not find what I wanted so I started to draw myself.
This then has become my second addiction and I have never looked back, I love thinking of new images, and its just fabulous to see others take them and make them into beautiful works of art.
Long may it continue!
and
THE STAMPMAN
We are kindly sponsored for this challenge by The Stampman (and Lady of course!) who are ofering the winner a £10 voucher for their store, you can spend this online, in the shop or if you're lucky enough to see them at a show! They have a ton of items in store, enough to tickle any crafty taste bud.
Sunday 22 September 2013
Winged things - pondery thoughts about our cards

I am not sure what I don't like - perhaps the green mat? And I think the colouring was off, too. So what to do with this?
I've put it in my box of made cards anyway. When the box is full I take it in to work and if anyone asks me if I have any cards, I say I do and they can rummage through.
What's weird, though, is that sometimes they will pick a card like this, that I don't like and they love it.
So what I think I am saying is, don't ever give up on your cards. Even if you don't like the finished result, someone else may. And even if it didn't come out the way you wanted, you have learned something to bear in mind for the future. In my case, acid green is not my thing...
Monday 16 September 2013
Challenge 100 - Winged things

Welcome to our latest challenge at Crafty Cardmakers where we would like to see Winged Things. Your project must have something with wings as a major focal point. Not a tiny butterly charm, or a small bee in the corner of an image, the wings need to be obviously part of the focal point. Fairies, angels, LARGE butterflies, birds etc. would qualify.
My card came about when I needed a "quick win" and utilised quite a lot of things I had already got in my stash box (backing mat, butterflies and sentiment).
The base card was brown DL size, and the backing mat was embossed with a cuttlebug embossing folder (script) and distressed with vintage photo distress inks. I used oval nesties for the photograph and the mat and layers in the centre. The two butterflies were spellbinders dies, also distressed with vintage photo. The sentiment was a bought one.
I was really pleased with the way this came out.
We are sponsored by
with three digis of the winner's choice from their great range

AND ALSO BY
With a prize of £12.00 to spend at your favourite Woodware Stockist, either in store or on line.
Woodware are a Yorkshire based family owned business, as well as distributing Dreamweaver Stencils and Stampendous Stamps we have a wonderful range of stamps designed for us by Francoise Read and Jane Gill. We also scour the world for new and innovative products for the crafty card maker, and have a great range of punches and tools of the trade, to find stockists in your area or to see the range visit the website www.woodware.co.uk.
Our design team are playing along with the challenge so check out our blog, which is there for inspiration at www.woodware.co.uk/blog.
Monday 2 September 2013
Crafty Cardmakers Challenge 99 - Christmas Snow and Ice

Welcome to Crafty Cardmakers latest challenge, hosted by Josephine, who has chosen the theme of 'Christmas Snow and Ice'.
As the hot weather draws to a close, she would like to see us preparing for Winter with some Christmas Snow and Ice.
Your creation must include either a representation of snow or ice, plus a Christmas theme in order to qualify for the Winner or Top 5 slots
Christmas is probably the time of year when we send the most cards, at least in one go! For my card this time, I decided to continue my quest to use up some of the stash I already had from previous years and so went on a treasure hunt through my "bits" box.
I used a 6 x 6 inch square card base with a texture, which I ran through my cuttlebug in an old Docrafts embossing folder. This gave me icy snowflakes around a centre framed area. To make the snowflakes pop, I used my trusty distress ink (tumbled glass), but only around the edge. It hasn't come out particularly well in the photograph, but I used a quickie glue pen and some glamour dust to add an icy sparkle both to the snowflakes and the frame.
Next, I used a small small topper from a hunkydory kit of (I think) 2 years ago, which went into the centre of the frame, after I had added some "falling snow" with the quickie glue pen and some glitter. Lastly, I added a sentiment embellishment from the same kit.
One card down- about 40 or so to go!!!
This time...
I have been drawing since a child and studied graphics at College many years ago, I now work as a Medical photographer part time but my love was always drawing. I started cardmaking about 4yrs ago when I bought my daughter a cardmaking kit which we did together, but I’m afraid I got the bug! My daughter preferred scrapbooking. I then started looking online at other blogs and this then became my passion and I loved sharing my cards with likeminded people.
I love stamping and loved finding images, but sometimes I could not find what I wanted so I started to draw myself.
This then has become my second addiction and I have never looked back, I love thinking of new images, and its just fabulous to see others take them and make them into beautiful works of art.
Long may it continue!
and
HOBBY ART
with these two gorgeous stamps:-
Archie and Pals
Archie and Pals

Bertie The Snowman


Look at the gallery on my blog - jennymayes.com - for lots of card ideas using the Hobby Art range.
We're pleased to sponsor the Crafty Cardmakers Challenge and look forward to seeing the entries.
Good luck everyone. Jenny and all. X
Wednesday 14 August 2013
Birthday card

My brief was to make a card for a lady who loved her stripey teeshirts.
I used a pearlescent card for my square base card, and matted onto that a square of stripey paper from my stash.
To one side I put some brown ribbon to cover the edge and provide definition to the small stamped teeshirts I cut out from the same stripey paper.
I stamped the image onto the back of the pearlescent card, and coloured it with coloured pencils. Around the edge of the card I used Pumice Stone distress ink, which matched the yellowy beige colour of the yellow striped paper really well. Finally I printed out the sentiments on my printer.
Having already taken this picture, I then added three small gemstones in the top right hand corner of the base card!
Sunday 11 August 2013
Gilded fish...
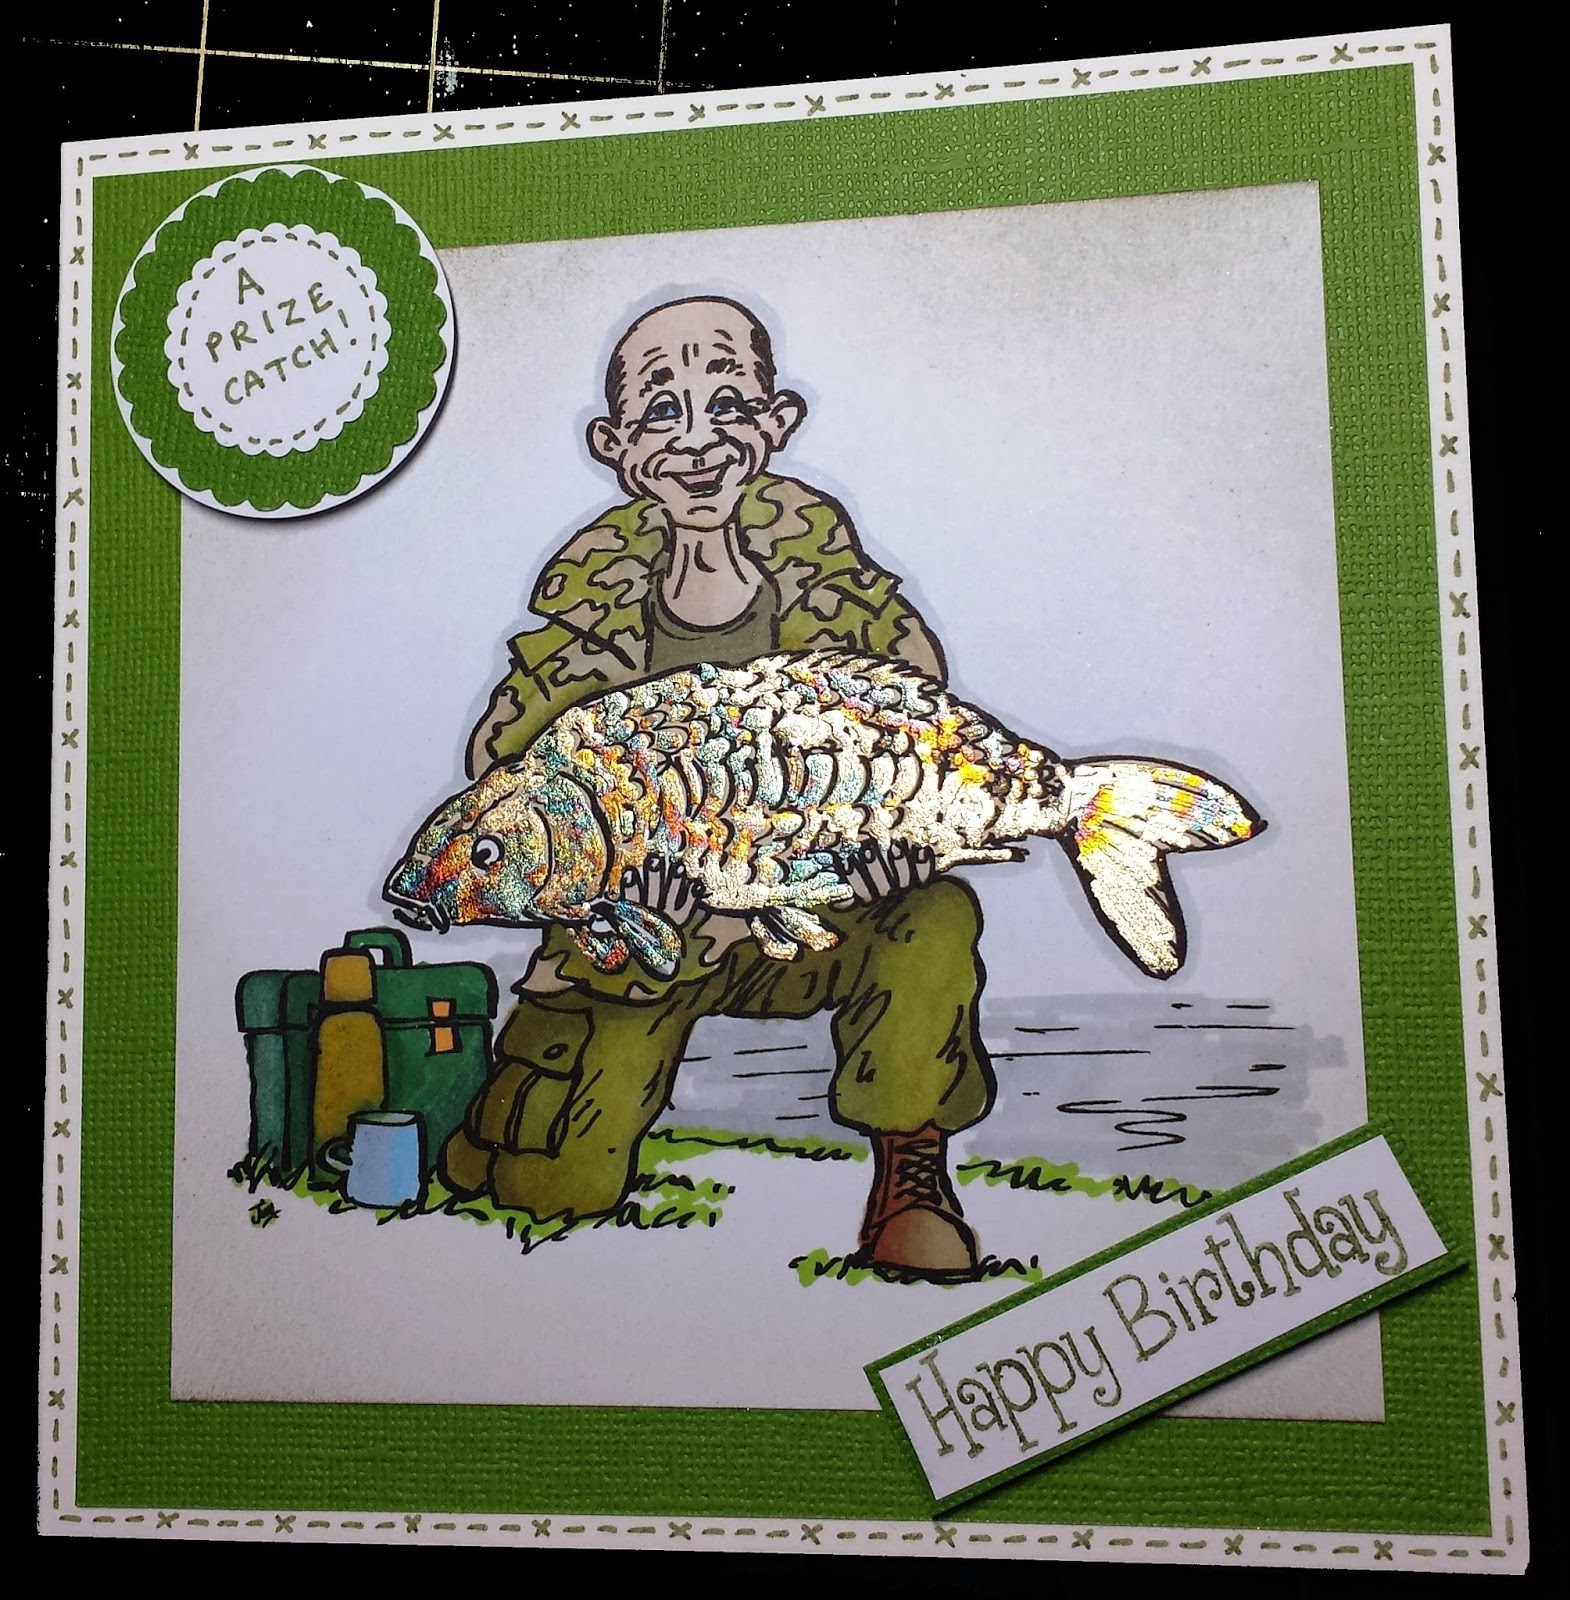
Then I had a lightbulb moment, and thought "gilding flakes"!!!
Using a quickie glue pen I coloured in the fish again, and waited for it to go clear. Then I used some morris dancer gilding flakes from Indigo blu, buffed the image with my scootchie sponge and hey presto! A really lifelike fish!
The photo I took under the ottlite was the best one, as that really brought out the gleaming fish.
Otherwise, it was a straightforward card - 6" square base card, layered with some green textured card from my stash. I did some faux stitching around the edge and used punches for the circular sentiment (handwritten..) and a stamped Happy Birthday on some scrap card for the other one.
Thursday 8 August 2013
Sympathy card

I used centura pearl cardstock for the card, making a 7" x 5" base. I ran a piece of the silver toned card through my Grand Calibur in my 7 x 5 lattice embossing folder to make a base topper, layering it with some plain black.
Onto this base topper, I added a lattice diecut shape cut from the same card, but backed with a different type of pearlescent card which had a more distinctly cream tone from my stash.
I then cut out a cross using a spellbinders die, which I embellished with pearls and put that onto the top of the trellis arch.

I made two small and 1 large roses and leaves from the pearlescent card, using two different size 6 petal paper punches. They were coloured with distress inks before being made up and I also included some paper flowers from my stash with some pearls in the centre. Finally, I added a small narrow black ribbon bow.
The sentiment was a rubber stamped banner stamped with versamark and embossed with fine gold detail powder.

Monday 29 July 2013
Crafty Cardmakers challenge 97 - 1 image, 2 patterned papers and 3 embellishments

Welcome to the latest challenge at Crafty Cardmakers, hosted by Elaine who has chosen the theme '1,2,3'
This means projects along the theme of 1,2,3
1 image,
2 patterned papers and
3 embellishments
For my card, I have used a gorgeous backing paper and image from our sponsors, Paper Shelter, coloured with Promarkers and a coordinating background paper from my stash (I think it was from a Making Cards magazine).
My 3 embellishments are: pearls, flowers and a ribbon edging.
My 3 embellishments are: pearls, flowers and a ribbon edging.

I decided to make a twisted easel card (one of my favourite card folds) and used a single A4 sheet cut down to 6 inches when folded, with a pearlescent peach coloured card for the image topper.
On the base of the card, I used my complementary backing paper, overstamped with a sentiment and some flowers and distressed around the edges with Marigold distress ink. I edged this backing sheet with a flexible gold peel off. In the top right hand corner I glued three white flowers, with a pearl in the centre of each.
 To make the stop, I used a part of the backing paper cut out with a circle punch and mounted it onto peach pearlescent card. I used the flexible peel off on this too, and finally edged it with a faux stitch all around the edge. This embellishment was used as the "stop" for the card.
 On the front flap, I used the backing paper from Paper Shelter, and put a ribbon trim down the right hand side. I did some faux stitching all round the edge of the card using the fine tip of a promarker in brown.
 The image itself was coloured using promarkers and was then mounted onto a peach pearlescent coloured card from my stash. This was stuck onto the card front in the bottom right hand corner only, so that it would swivel and stand up.
Finally, I stamped a greeting onto the peach pearlescent card and stuck that onto the bottom of the image.
On the base of the card, I used my complementary backing paper, overstamped with a sentiment and some flowers and distressed around the edges with Marigold distress ink. I edged this backing sheet with a flexible gold peel off. In the top right hand corner I glued three white flowers, with a pearl in the centre of each.
 To make the stop, I used a part of the backing paper cut out with a circle punch and mounted it onto peach pearlescent card. I used the flexible peel off on this too, and finally edged it with a faux stitch all around the edge. This embellishment was used as the "stop" for the card.
 On the front flap, I used the backing paper from Paper Shelter, and put a ribbon trim down the right hand side. I did some faux stitching all round the edge of the card using the fine tip of a promarker in brown.
Finally, I stamped a greeting onto the peach pearlescent card and stuck that onto the bottom of the image.
and
WOODWARE CRAFT COLLECTION
With a prize of £12.00 to spend at your favourite Woodware Stockist, either in store or on line.

Woodware are a Yorkshire based family owned business, as well as distributing Dreamweaver Stencils and Stampendous Stamps we have a wonderful range of stamps designed for us by Francoise Read and Jane Gill. We also scour the world for new and innovative products for the crafty card maker, and have a great range of punches and tools of the trade, to find stockists in your area or to see the range visit the website www.woodware.co.uk.
Our design team are playing along with the challenge so check out our blog, which is there for inspiration at www.woodware.co.uk/blog.
Monday 15 July 2013
Crafty Cardmakers challenge 96 - Birthday

Welcome to the latest challenge at Crafty Cardmakers, hosted by Lin, who has chosen the theme of 'Birthday'.
As it's our birthday, 4 years since our very first article was published and Crafty Cardmakers was born, Lin would like to see your birthday creations to celebrate our birthday.
I chose for this challenge a card I made recently for one of my friends. The design of the card is another that was inspired by a demonstration of crafters companion products by Nandia at In2Crafting, at Wickford.
I used my favourite 6" square card base, and a piece of blue card from my stash for the base layer. This was run through my bug in an embossing folder (sorry - forget which one!) and I took the top off using my sanding block.
For the main image, I used some stamps from Crafters Companion. First, I stamped the image onto a piece of super smooth card and coloured it using my promarkers. Then, I drew a square, but leaving the image protruding over the edge of where the line would be. The other three sides were cut straight, but I cut round the stamped image, so it looked like it was decoupaged onto the white square. In the bottom right hand corner, I stamped my sentiment.
Using a sissiz butterfly die and stamp set, I cut out two butterflies, and layered one on top of the other. I applied glitter to the bottom layer and stuck the butterfly in the top right hand corner of my white card.
Finally, using a blue promarker with a finetip, I drew by hand a wiggly line to make a square within the white square.
I then matted the white square onto a piece of contrasting card, chosen to match the green of the leaves, and then layered the whole thing onto my base card.
We are sponsored by

I have been drawing since a child and studied graphics at College many years ago, I now work as a Medical photographer part time but my love was always drawing. I started cardmaking about 4yrs ago when I bought my daughter a cardmaking kit which we did together, but I’m afraid I got the bug! My daughter preferred scrapbooking. I then started looking online at other blogs and this then became my passion and I loved sharing my cards with like minded people. I love stamping and loved finding images, but sometimes I could not find what I wanted so I started to draw myself. This then has become my second addiction and I have never looked back, I love thinking of new images, and its just fabulous to see others take them and make them into beautiful works of art. Long may it continue!
and also by
.jpg)

As a family business we're a friendly, helpful, bunch at Hobby Art. All our stamps are designed by us and manufactured in Britain. Look at the gallery on my blog -jennymayes.com - for lots of card ideas using the Hobby Art range. We're pleased to sponsor the Crafty Cardmakers Challenge and look forward to seeing the entries.
Good luck everyone. Jenny and all. X
Good luck everyone. Jenny and all. X
Subscribe to:
Posts (Atom)